

And it felt so good ripping it all off.
 Well that's a bit of a lie as I didn't really get to rip anything off- see the trick to recovering a couch is to keep the pieces of fabric intact, only ripping the seams- this was you will already have a pattern for each piece you need to cut out from your new material.
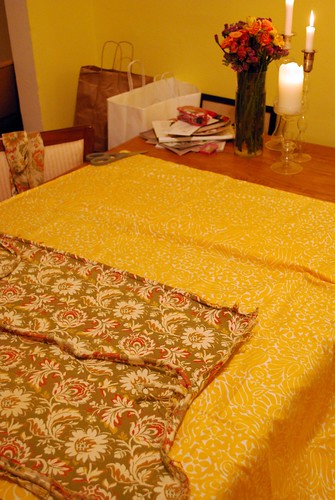 Like this! You just take the piece of fabric from your couch (i believe this the bottom of a cushion) and lay it down flat on your new fabric and cut it out.
A couple things to keep in mind:
1- You want to make sure that you are keeping the seams in mind (on my old fabric the seams are the rolled up edges) so either lay them down as you are cutting or just cut 1/4- 1/2 inch away from the original fabric to account for seam allowance.2- When cutting out your fabric, always lay the face of the old fabric onto the face of the new fabric or just make sure you are consistent otherwise you will end up with two identical pieces cut out for your right armrest.

Once you have your pieces cut out, you just want to affix them back onto the frame of the couch in the exact same way that they on there originally. This means paying attention to the upholstering of the couch while you are taking the pieces down. So that I wouldn't have to rely entirely on my memory of how it used to be assembled, we left the left side of the couch semi-attached (notably the intricate armrest area) so we had a guide for the re-assembly on the other side.
 We used a staple gun for 80% of this recovering, a sewing machine for the rest and only needed a hammer to reinforce some staples that hadn't gone in all the way. Use a very light touch when hammering in the staples as the hammer tends to leave unsightly black marks on the fabric (no matter how clean you think it is).
 To finish it off, we had to find some trim to cover all those staples. The orignal couch had some really gross white braided satin trim, but once we sanded down the wooden features, the couch was feeling a little beachy so I just bought some twine from the hardware store (far too much twine, I might add).
 This part was actually the most painful- it took 4 episode of Law & Order, 2 rows of twine and 3 severe burns to my fingers.
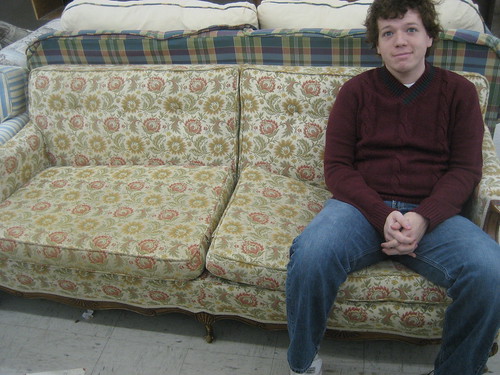 But looking back at this monstrosity....
I'd say it was worth it.
 Detail shot! Hello beautiful wooden features!
Admire the perfectly tucked fabric and curvature of the trim.
 aaaaaah- Totally worth it.
- Cost: 3 shower curtains from Crate and Barrel at $35 each + 2 yards of extra yellow fabric at $12 + the twine at $4.95 + a couple sheets of sandpaper at $1.95= $123.90
- Time: I would say a full weekend
- Ease: If you have a good dose of common sense, this is not that difficult- just a but labour intensive and time consuming.
great work! i would have never figured out how to do all that.
ReplyDeleteWow... this looks amazing! I happened upon your blog looking for Daring Baker posts, but I am not disappointed. :)
ReplyDelete