
And why you might ask? Let me show you:
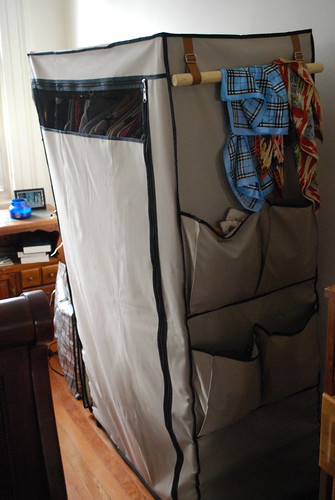
Pretty hideous, right? Although the boyfriend and I were very fortunate when acquiring furniture, we did not make out with a real wardrobe. And where would we put one anyway? The apartment came with one small closet across from the front door but this was enough for someone with no clothes. which is not me. Thankfully, my mom had the above temporary wardrobe in the garage and this would have to suffice.
Then is started sagging. And leaning into Kris's "space". And driving us both nuts. So Kris decided it was due to the poles coming undone and all he would have to do is to bang them back into place. He took a hammer to it and pretty much banged it into an early but deserving grave. Something had to be done.
I theorized that the wall next to my side of the bed, the one with the bookshelf could become some sort of hanging space but the fireplace was too shallow and would mean hangers poking out from the wall. The only solution would be to hang clothes flush to the wall and hope I could find some accommodating shelves.
We headed to Ikea and I found everything I needed down to the screws and spacers.
 Got myself 4 of these

Got myself 4 of these3 of these babies

And just so all my hangers would be the same and swivel- I picked up a pack of these.
The result?
 Ta da!!! And I have Kris to thank for all the manual labor- he did a really fantastic job with this and none of the shelves have even fallen off!
And for less than 100 bucks I got myself a full wall worth of storage. Yes, I have had to make some compromises, but keeping only my work clothes on hangers means that getting ready in the morning is practically mindless.

Now all i need is a night stand- What do you think between this recycled aluminum one and this nestling table set?
- Cost: less than $100
- Time: An afternoon
- Ease: Pretty darn easy if you have a big burly man!
Nice blog!
ReplyDeleteI remember doing something similar when we first started out - we lived out of cardboard boxes for ages until they gave up!
WoW...great idea..i'm impressed with your idea and your boyfriend's handy work...
ReplyDeletelove, love, love this claire! so creative. as for the nightstand, go with the recycles aluminum one, it's really cool! i cannot wait to come see you and your apartment. i need to plan a trip this summer. my last day is june 18th and summer school doesn't begin until july 6th, so let me know what works for you.
ReplyDeletexoxo,
anna louise
(p.s. mad kudos to kris for his construction skills! very impressive.)
hi just found ur blog and love it. your "closet" wall reminds me of my first room in nyc, i similarly had my clothes folded on shelves and hanging from a garment rack. it works, and ur setup looks so organized!
ReplyDeleteThanks Julia! but I'll let you in on a little secret: it aint so organized right now... but it's still better than that silly temporary wardrobe!
ReplyDeletei really like how it says that nothing even has fallen off as if you're expecting it too, hahahahha. loooove it Claire and Kris! Just be careful of the radiator! Even though it's probably off now. Where's the old shelf and dvd's?
ReplyDelete