Thursday, January 29, 2009

Tuiles with the Daring Bakers

I've learned my lesson. I really have! I should not wait until the day before its due to bake up the monthly Daring Baker's Challenge. Although I have done so successfully in the past, it's just not worth it in the end. Also- I should use the forum for inspiration. Because I'll admit that I wasn't super duper excited by the thought of making tuiles, but browsing through all the other baker's posts today made me realize how much I missed out! What fantastic and easy creations you've come up with! I think the problem stems from my fixation on making tuile cups that I would fill with ice cream and top with some delicious chocolate sauce (like this one) so when I managed to crack every tuile in sight, I kinda just gave in and let the evil baking spirits win. It just wasn't meant to be! At least not last night.

This month's challenge is brought to us by Karen of Bake My Day and Zorra of 1x umruehren bitte aka Kochtopf. They have chosen Tuiles from The Chocolate Book by Angélique Schmeink and Nougatine and Chocolate Tuiles from Michel Roux.

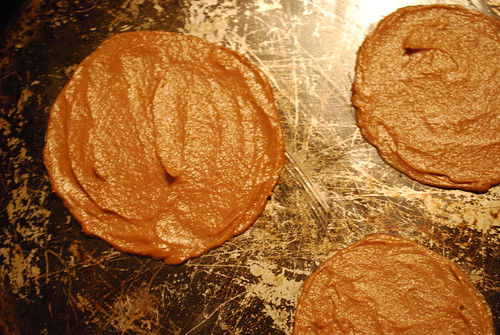
I chose to do the simple tuile recipe and it was indeed very simply. Kinda just mix up your ingredients until they are nice and homogeneous. The recipe says to put your dough and buttered pan in the fridge for about 15 minutes to firm up. I actually left mine in the fridge overnight and should have let the dough heat up a bit. ..


It was a bit temperamental... I also should not have added the chocolate powder to my dough! Having not read the recipe through (doh!), I didn't realize the powder was supposed to be added to a small batch of the dough to use as embellishments on the tuile- which would have been lovely! But in my case, the chocolate kinda diluted any flavor and made for a very "meh" cookie.


Pop these babies in the oven for about 5-10 minutes until they are brown around the edges. Once you remove them from the oven, quickly start shaping the cookies.

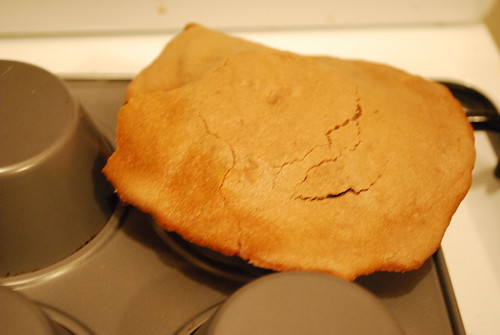
Might have left mine in too long.. but it's hard to tell when the cookies are already brown! They did not really want to bend any which way.

After two failed batches and my oven turning off about 3 times during the process, I had to give in. Here is the lone survivor- slightly crinkled and not very tasty :(

At least he's on a pretty blue plate! right? right?!
Anyway, here's the recipe- which I solemnly swear to try again once the evil spirits have vacated my kitchen!
Tuile
From “The Chocolate Book”, written by female Dutch Master chef Angélique Schmeinck.
Yields: 20 small butterflies/6 large (butterflies are just an example)
Preparation time batter 10 minutes, waiting time 30 minutes,
Baking time: 5-10 minutes per batch
  • 65 grams / ¼ cup / 2.3 ounces softened butter (not melted but soft)
  • 60 grams / ½ cup / 2.1 ounces sifted confectioner’s sugar
  • 1 sachet vanilla sugar (7 grams or substitute with a dash of vanilla extract)
  • 2 large egg whites (slightly whisked with a fork)
  • 65 grams / 1/2 cup / 2.3 ounces sifted all purpose flour
  • 1 table spoon cocoa powder/or food coloring of choice
  • Butter/spray to grease baking sheet
Oven: 180C / 350F
Using a hand whisk or a stand mixer fitted with the paddle (low speed) and cream butter, sugar and vanilla to a paste. Keep stirring while you gradually add the egg whites. Continue to add the flour in small batches and stir to achieve a homogeneous and smooth batter/paste. Be careful to not over mix.
Cover the bowl with plastic wrap and chill in the fridge for at least 30 minutes to firm up. (This batter will keep in the fridge for up to a week, take it out 30 minutes before you plan to use it).
Line a baking sheet with parchment paper or grease with either butter/spray and chill in the fridge for at least 15 minutes. This will help spread the batter more easily if using a stencil/cardboard template such as the butterfly. Press the stencil on the baking sheet and use an off sided spatula to spread batter. Leave some room in between your shapes. Mix a small part of the batter with the cocoa and a few drops of warm water until evenly colored. Use this colored batter in a paper piping bag and proceed to pipe decorations on the wings and body of the butterfly.
Bake butterflies in a preheated oven (180C/350F) for about 5-10 minutes or until the edges turn golden brown. Immediately release from baking sheet and proceed to shape/bend the cookies in the desired shape. These cookies have to be shaped when still warm, you might want to bake a small amount at a time or maybe put them in the oven to warm them up again. (Haven’t tried that). Or: place a baking sheet toward the front of the warm oven, leaving the door half open. The warmth will keep the cookies malleable.
If you don’t want to do stencil shapes, you might want to transfer the batter into a piping bag fitted with a small plain tip. Pipe the desired shapes and bake. Shape immediately after baking using for instance a rolling pin, a broom handle, cups, cones….

Tuesday, January 27, 2009

Pioneer Woman's Cauliflower Soup

I'm an avid reader of ThePioneerWomanCooks.com and I love soup. Here is a post where I combine that love with her kickin' recipe for Cauliflower Soup.


Start off with all your ingredients. Some organic and some not so much (I'm looking at you cauliflower head!)


Next up- Chopping! It's always about the chopping with good soup.
God thing I've designated a special chopping table.

Throw it all in a pot and cook on low heat until the veggies are tender.
Then you're gonna add in your broth and make a white sauce.
And once you mix those two and add in a cup of sour cream, you're good to go!

I just added a little Parmesan to mine.

And Kris had to add a little hot sauce.

PW’s Mom’s Cauliflower Soup

By Ree Drummond from ThePioneerWomanCooks.com

  • 1 stick butter
  • 1/2 onion, finely diced
  • 1 carrot, finely diced
  • 1 celery stalk, finely diced
  • 1 to 2 heads cauliflower, roughly chopped
  • 2 tablespoons chopped fresh or dried parsley
  • 2 quarts low-sodium chicken broth or stock
  • 2 cups whole milk
  • 6 tablespoons flour
  • 1 cup half & half
  • 2 to 4 teaspoons salt, to taste
  • 1 generous cup sour cream, at room temperature

I like mine with Bacon too


In a large soup pot or dutch oven, melt 4 tablespoons butter. Add the onion and cook for a few minutes, or until it starts to turn brown. Add the carrots and celery and cook an addition couple of minutes. Add cauliflower and parsley and stir to combine. Cover and cook over very low heat for 15 minutes.
After 15 minutes, pour in chicken stock or broth. Bring to a boil, then reduce heat and allow to simmer.
In a medium saucepan, melt 4 tablespoons butter. Mix the flour with the milk and whisk to combine. Add flour-milk mixture slowly to the butter, whisking constantly. Remove from heat and stir in 1 cup half & half.
Add mixture to the simmering soup. Allow to simmer for 15 to 20 minutes. Check seasoning and add more salt or pepper if necessary.
Just before serving, place the sour cream in a serving bowl or soup tureen. Add two to three ladles of hot soup into the tureen and stir to combine with the sour cream. Pour in remaining soup and stir.

Monday, January 26, 2009

Weekly Round Up: Yves Saint Laurent

Christie's will be having a trully fabulous sale this February in Paris of the estate of Yves Saint Laurent and Pierre Berge. I simply cannot wait to see it all- but for now here are some highlights I've fallen in love with:

SIR EDWARD COLEY BURNE-JONES, BART., A.R.A., R.W.S. (BIRMINGHAM 1833 - 1898 LONDRES)

Luna

Sale 1209 Lot 91
Estimate: 300,000 - 500,000 Euros

SPHERE ARMILLAIRE SUPPORTEE PAR CHRONOS EN ARGENT ET VERMEIL

Sale 1209 Lot 157
Estimate: 200,000 - 300,000 Euros

EDOUARD VUILLARD (1868-1940)
Les Lilas

Sale 1209 Lot 11
Estimate: 300,000 - 400,000 Euros

CAMEE EN SARDOINE SCULPTEE REPRESENTANT UN SACRIFICE SUR L'AUTEL D'HYGIEIA
Sale 1209 Lot 415
Estimate: 5,000 - 8,000 Euros

SIR EDWARD COLEY BURNE-JONES, BART., A.R.A., R.W.S. (BIRMINGHAM 1833 - 1898 LONDRES)
Paradis, avec l'adoration de l'agneau
Sale 1209 Lot 91
Estimate: 500,000 - 700,000 Euros

Friday, January 23, 2009

Streamlinning a wardrobe

Since moving back to the states, I've been on a mission to streamline my wardrobe. Although I'm an organizational freak, I've realized recently that I own a lot of crappy clothes. I just do. Either they don't fit anymore, the color isn't flattering, I haven't worn it in years or I just don't like it anymore. I've tried organizing my closet several times over but I've never taken a harsh approach to getting rid of pieces that just don't work anymore. So when I pulled out my winter sweaters a couple weeks ago to pack them for a New York winter, I ended up getting rid of about 70% of them. Gone were the chunky sweaters I hadn't worn in years: the one I bought on sale from H&M in an ugly poopy green/brown, the too-short-in-the-torso cream v-neck passed down from my mom, the "funky" chunky tie cardigan in about 8 colors. I had to stop buying the bright color version of all my mom's clothes because she hardly gets rid of her clothing and I'm constantly cycling through new trends. I've always tried to be elegant with a funky edge, but that doesn't mean I should get the purple Mary-Janes from the sale rack. My mom would have bought them full price in black. And that has to be my new approach. New Year's resolution anyone?

The only flipside I have found in this Recession is the fact that practically every store is having a massive sale. Here is what I've been amassing since :


Classic herringbone pencil skirt in bright papaya (I'm gonna go ahead and say it's red)
Orignally $118
Snatched up for $35

Merino michelle V-neck cardigan in golden avocado
Originally $88
Snatched up for $60 (still pricey but it's an investment piece, ok?)

City Fit premium chino in British khaki
Originally $98
Snatched up for $14


Favorite-fit donegal tweed Ludlow trouser in graphite

Originally $138

Snatched up for $50


Black Jcrew Cardigan (with uber cute buttons)
Originally $69.99
Snatched up for $25.99

And if I have to streamline my wardrobe, then I'm gonna have to buy some funky jewelery.

Queen Regent Earrings

Originally $48
Snatched up for $9.99


Bohemian Bird Necklace from Anthropologie
Originally $49.99
Snatched up for $9.99


Gold and Pearl Studs (because I love me some pearls)
Originally $39.99
Snatched up for $19.99


Thursday, January 22, 2009

Cooking with Leon

One of my favorite restaurants in London is called Leon. Ok, so maybe it's not really a restaurant, more of a fast food joint- but everything they serve is natural, delicious and good for you. What more could you ask for?? Their menu is always changing in terms of the seasons with new dishes and old favorites so you can always bank on weather appropriate food. Like this Winter Root Soup with Sage and Chestnuts from their new cookbook. I absolutely LOVE chestnuts and since my local grocery had them on sale (they must think it's only a Christmas food) I knew this was meant to be. And this recipe sure did deliver- it practically converted my chesnut-hating boyfriend who could not stop talking about the "really good flavor". So try it out, yee of little chesnut-faith, and report back!


We start out, like most soup recipes, with a lot of chopping (at night... which explains the golden hue of these pictures...)

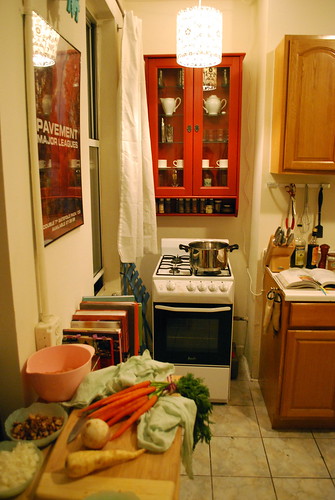
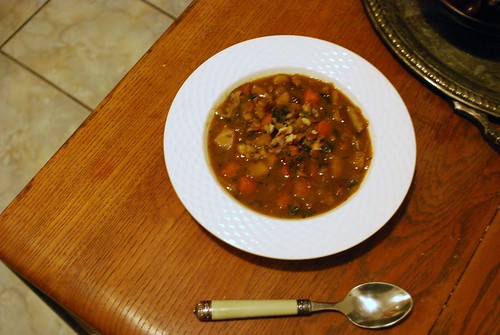
Here we have some chopped onion, chestnuts, carrots, a parsnip and a large turnip. (not pictured: a bundle of sage)

After reducing the onions in some butter, add in all the veggies and cook on low heat covered for about 35 minutes or until tender. When I did this, my veggies started blackening and sticking to the bottom so I added in some chicken broth to loosen things up. In retrospect, I think I had my heat up too high, so watch that flame!
Then add in the rest of the chicken broth and chopped sage. Bring to a boil and then let simmer a bit.
Sprinkle the top with some reserved chestnuts and ENJOY!


Winter Root Soup with Sage & Chestnuts
From the Leon cookbook by Allegra McEvedy

Slow cooking is the right way to get the most of your root veg, and matched up here with some chestnuts for sweetness and winter's favorite herb, sage, they really are deserving of their place centre stage. Obviously if you can get them, and have the time and inclination, roasting your own chestnuts would be even more rewarding. We felt this was more of a butter kind of soup, but olive oil can always be used instead- better for you, but in this intance maybe a little less yum for the vegans.

Serves 5+
  • 75g Butter
  • 2 large onions, diced
  • 150g pre-cooked, vacuum-packed chestnuts, chopped
  • 1 good-sized parsnip
  • 1/3 of a small celeriac, cut into chunky dice
  • 2 mall or 1 large carrot, cut into chunky dice
  • 1/3 of a swede, cut into chunky dice
  • 1.5 litres light vegetable stock
  • a small handful of sage, leaves picked and chopped
  • a small handful of thyme, leaves picked an chopped
  • 2 bay leaves
  • a big handful of flat-leaf parsley, leaves picked and chopped
  • salt and pepper
Melt the butter in a large pan and fry the onions and two thirds of the chesnuts until the onions have softened
After about 10 minutes add the root veg and continue to cook until they are slightly tender- about half an hour with the lid on.
Now add the stock, sage, thyme and bay leaves and to the boil. Reduce the heat and simmer for 30-45 minutes, until the vegetables are soft.
Check the seasoning, then take out about 3 large ladlefuls of the veg with a slotted spoon and blend to a puree. Add this back to the soup to thicken it, then stir in the parsley.
Slice the rest of the chestnuts and scatter them on top, then season well, my friend.

Claire's Note: I found that this soup made enough for 2 people and did not need any thickening. it might be that i didn't have all the proper vegetalbes, but I thought I had made proper substitutions in terms of amount.... so who knows. Just be sure to keep the heat on low when cooking the root veg in the beginning or you will end up with a black-bottomed pot.

Wednesday, January 21, 2009

Keep Calm & Carry On - The History of a Poster

I think I've officially joined the swanky part of the blogosphere by purchasing this poster:


Some of you may have seen in when I posted pictures of my new place:


When I was still living in London, I bought this poster online, but because I can't access Etsy at work where I had seen many prints for sale, I had to find another vendor. And I really lucked out because not only was my print cheaper (£4.99) but I ended up buying it from Barter Books, the bookstore that discovered it. The story behind this poster is really interesting so I've included here and if you want you own poster just click here! (and wouldn't you know, the poster is now only £3.60!)

"In the spring of 1939, with war against Germany all but inevitable, the British Government's Ministry of Information commissioned a series of propaganda posters to be distributed throughout the country at the onset of hostilities. it was feared that in the early months of the war Britain would be subjected to gas attacks, heavy bombings raids and even invasion. The posters were intended to offer the public reassurance in the dark days which lay ahead.

The posters were to be uniform in style and were to feature a 'special and handsome' typeface making them difficult for the enemy to counterfeit. The intent of the poster was to convey a message from the King to his people, to assure them that 'all necessary measures to defend the nation were being taken', and to stress an 'attitude of mind' rather than any specific claim. On the eve of a war which Britain was ill equiped to fight, it was no possible to know what the nation's future aims and objectives might be.

At the end of August 1939 three designs went into production with an overall print budget of £20,600 for five million posters. The first poster, of which over a million were printed, carried a slogan suggested by a civil servant named Waterfield. Using the crown of George VI as the only graphic device, the stark red and white poster read 'Your Courage, Your Cheerfulness, Your Resolution will Bring us Victory'. A similar poster, of which around 600,000 were issued, carried the slogan 'Freedom is in Peril'. But the third design, of which over 2.5 million posters were printed, simply read 'Keep Calm and Carry On'.

The first two designs were distributed in September 1939 and immediately began to appear in shop windows, on railway platforms, and on advertising hoardings up and down the country. But the 'Keep Calm' posters were held in reserve, intended for use only in times of crisis of invasion. Although some may have found their way onto Government office walls, the poster was never officially issued and so remained virtually unseen by the public- unseen, that is, until a rare copy turned up more than fifty years later in a box of old books bought in at auction by Barter Book in Alnwick.

Shop owners Stuart and Mary Manley liked the poster so much that they had it framed and placed near the till in Barter Books. It quickly proved so popular with customers and attracted so many enquiries that in 2001 Stuart and Mary decided to commission a facsimile edition of their original poster which has since become a best-seller, both in the shop and via the Internet.

The Ministry of Information commissioned numerous other propaganda posters for use on the home front during the Second World War. Some have become well-known and highly collectible, such as the cartoonist Fougasse's 'Careless Talk Costs Lives' series. But ours has remained a secret until now. Unfortunately, we cannot acknowledge the individuals responsible for the 'Keep Calm' poster. But it's a credit to those nameless artists that long after the war was won people everywhere are still finding reassurance in their distinctive and handsome design, and the very special 'attitude of mind' they managed to convey. "

Primary source of information: Lewis, R.M., 'Undergraduate Thesis: The planning, design and reception of British home front propaganda posters of the Second World War'. Written April 1997. Accessed April 2007. http://www.ww2posters.co.uk/research_project/ugrad/index.htm

Thursday, January 15, 2009

Curried Chicken Salad

So it's been absolutely freezing in New York lately- much more than my fur lined shoes can handle. My natural inclination has been to eat nothing but soup, but eventually my body just cried out for something fresh and crunchy. And although I've never been a fan of chicken salad, I just knew this would hit the spot. I think my problem with most chicken salads (as with most coleslaw) is that I can't handle all the mayo. I don't like eating sludge. But this one has just enough to coat the chicken while the grapes and celery add a welcome crispness (unlike the crispness my ears have been enduring- i'll be shocked if they make it home tonight.)


Start by boiling some chicken thighs with a quartered lemon for about 45 minutes or until the meat is falling off.


Next get a sturdy man to tear up the meat, discarding the skin and bones.


Add the mayo, curry powder, honey and lemon juice to a mixing bowl and... mix.


Chop and add the celery, scallion and grapes.


Toast up some bread, add a big lettuce leaf and pile on the chicken salad. It doesn't get much yummier than this, my friends.

Curried Chicken Salad
from a Dave Lieberman recipe in Food Network Favorites

  • 4 whole chicken thighs, bone in, skin on
  • 1 lemon, quartered
  • 1/2 bunch cilantro, roughly chopped
  • Kosher salt and freshly ground black pepper
  • 1/4 cup mayonnaise
  • 1 teaspoon curry powder
  • 1 teaspoon honey
  • 1 teaspoon freshly squeezed lemon juice
  • 3 scallions, thinly sliced
  • 2 stalks celery, thinly sliced
  • 3/4 cup halved seedless red grapes
  • Butter lettuce leaves, for serving


Put the chicken thighs, lemon, and cilantro into a skillet or saucepan. Fill with water just to cover the chicken and season generously with salt and black pepper to taste. Bring to a boil over medium heat then reduce the heat to maintain a very gentle simmer. Cook, uncovered, until the chicken is tender and falling form the bones, about 40-45 minutes. Remove the chicken from the poaching liquid and allow to cool. When cool, remove the skin and strip the meat from the bones, discarding the skin and bones. Reserve the meat.

In a bowl, mix together the mayonnaise, curry, honey and lemon juice. Stir in the scallions, celery and grapes until combined. Add the shredded chicken and toss to combine. Season with salt and pepper to taste.

Wednesday, January 14, 2009

The Rest of the Apartment by Night

Here are some more pictures of the rest of the apartment. Sorry for the yellow haze on everything but I'm not often at home during daylight.


A shot from the bathroom. Kris' Steve Keene paintings and my crystal chandelier.


Kris didn't trust my necklace hanging idea. Just hand me some Elmer's Ultimate High Performance glue and I'm off.


The Kitchen includes a glass fronted red cabinet- on sale from Ikea.


Love the "Keep Calm and Carry on" poster from WWII Britain and there on the fridge is a Seasonality Chart from my Leon cookbook.


More jewellery

Gotta use that shelf my mom bequeathed to us!


Kris enjoys the newly decorated wall


And look! A European cheese map also came in my Leon cookbook!


Pavement poster and soon-to-be-painted-white robin egg blue cuckoo clock.